How to Create a New App Project in Android Studio v 2.3.2
How to build an Android app
Building an android app is tough for beginners. Creating a mobile application takes lots of patients and time. You can use the android studio project templates and android project examples in Android Studio to start with creating android applications. Developers website of Google provides android projects for students with source code. Once you have successfully installed Java SDK, then here is a quick guide on creating a new app project in Android Studiov 2.3.2.
Step 1: Create New Project in Android Studio
Step 2: Configure the project: Add Form Factors
Step 3: Add an Activity to application
Preparing “Install Solver for ConstraintLayout 1.0.2 (revision: 1)”.
Downloading https://dl.google.com/android/repository/com.android.support.constraint-constraint-layout-solver-1.0.2.zip
“Install Solver for ConstraintLayout 1.0.2 (revision: 1)” ready.
Finishing “Install Solver for ConstraintLayout 1.0.2 (revision: 1)”
Installing Solver for ConstraintLayout 1.0.2 in C:UsersAdminAppDataLocalAndroidSdkextrasm2repositorycomandroidsupportconstraintconstraint-layout-solver1.0.2
“Install Solver for ConstraintLayout 1.0.2 (revision: 1)” complete.
“Install Solver for ConstraintLayout 1.0.2 (revision: 1)” finished.
Preparing “Install ConstraintLayout for Android 1.0.2 (revision: 1)”.
Downloading https://dl.google.com/android/repository/com.android.support.constraint-constraint-layout-1.0.2.zip
“Install ConstraintLayout for Android 1.0.2 (revision: 1)” ready.
Finishing “Install ConstraintLayout for Android 1.0.2 (revision: 1)”
Installing ConstraintLayout for Android 1.0.2 in C:UsersAdminAppDataLocalAndroidSdkextrasm2repositorycomandroidsupportconstraintconstraint-layout1.0.2
“Install ConstraintLayout for Android 1.0.2 (revision: 1)” complete.
“Install ConstraintLayout for Android 1.0.2 (revision: 1)” finished.
Parsing C:UsersAdminAppDataLocalAndroidSdkadd-onsaddon-google_apis-google-24package.xml
Parsing C:UsersAdminAppDataLocalAndroidSdkbuild-tools25.0.2package.xml
Parsing C:UsersAdminAppDataLocalAndroidSdkdocspackage.xml
Parsing C:UsersAdminAppDataLocalAndroidSdkemulatorpackage.xml
Parsing C:UsersAdminAppDataLocalAndroidSdkextrasandroidm2repositorypackage.xml
Parsing C:UsersAdminAppDataLocalAndroidSdkextrasgooglem2repositorypackage.xml
Parsing C:UsersAdminAppDataLocalAndroidSdkextrasintelHardware_Accelerated_Execution_Managerpackage.xml
Parsing C:UsersAdminAppDataLocalAndroidSdkextrasm2repositorycomandroidsupportconstraintconstraint-layout-solver1.0.2package.xml
Parsing C:UsersAdminAppDataLocalAndroidSdkextrasm2repositorycomandroidsupportconstraintconstraint-layout1.0.2package.xml
Parsing C:UsersAdminAppDataLocalAndroidSdkpatcherv4package.xml
Parsing C:UsersAdminAppDataLocalAndroidSdkplatform-toolspackage.xml
Parsing C:UsersAdminAppDataLocalAndroidSdkplatformsandroid-25package.xml
Parsing C:UsersAdminAppDataLocalAndroidSdksourcesandroid-25package.xml
Parsing C:UsersAdminAppDataLocalAndroidSdksystem-imagesandroid-25google_apisx86package.xml
Parsing C:UsersAdminAppDataLocalAndroidSdktoolspackage.xml
Select Next.
A new window will appear titled as “Add an activity to Mobile”. You can see 12 activities listed in the window. You can select “Empty Activity” for example.
Select Next.
Step 3: Configure Your Activity
You have successfully created a New App Project in Android Studio v 2.3.2.
1 Minute Video TutorialNow you can try out and edit XML Command panel for coding of Android App.
App Tutorial: XML Editing Panel in Android Studio v 2.3.2
OpenAndroid Studio v 2.3.2
File > Open Recent > MyApplication
The Android project file will be loaded with hello world!
Select Android > App > manifests > AndroidManifest.xml
On the right hand, you can see the XML editing panel with a some
<
? xml version=”1.0″ encoding=”utf-8″?>
<manifest xmlns:android=”http://schemas.android.com/apk/res/android”package =”com . example. admin. myapplication “>
<application android : allowBackup =”true”android : icon=”@mipmap/ic_launcher”android : label=”@string/app_name”android : supportsRtl =”true”android : theme=”@style/AppTheme “>
<activity android : name=”. MainActivity “android : label=”@string/app_name”android : theme=”@style/AppTheme . NoActionBar”>
<intent -filter>
<action android: name=”android. intent. action. MAIN” />
<category android: name=”android. intent. category. LAUNCHER” />
</intent -filter>
</activity >
</application >
</manifest >
If you could see below the XML command
Changing Theme of New Android App
<
? xml version=”1.0″ encoding=”utf-8″?>
<manifest xmlns:android=”http://schemas.android.com/apk/res/android”package =”com . example. admin. myapplication “>
<application android : allowBackup =”true”android : icon=”@mipmap/ic_launcher”android : label=”@string/app_name”android : supportsRtl =”true”android : theme=”@style/AppTheme “>android : background=”#ff2438″
<activity android : name=”. MainActivity “android : label=”@string/app_name”android : theme=”@style/AppTheme . NoActionBar”>
<intent -filter>
<action android: name=”android. intent. action. MAIN” />
<category android: name=”android. intent. category. LAUNCHER” />
</intent -filter>
</activity >
</application >
</manifest >
We
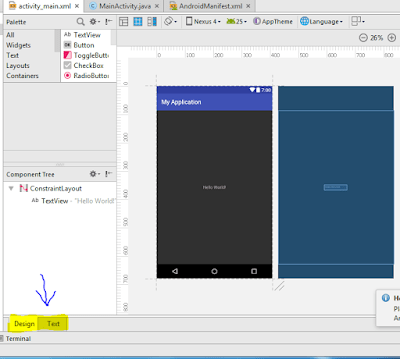
Accessing Layout Editor in Android Studio v 2.3.3
Open Android Studio
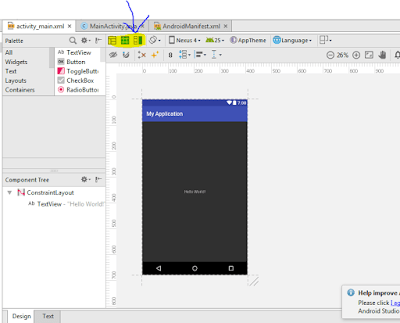
Open The Layout Editorin Android Studio v 2.3.3
 |
 |
 .
. .
.
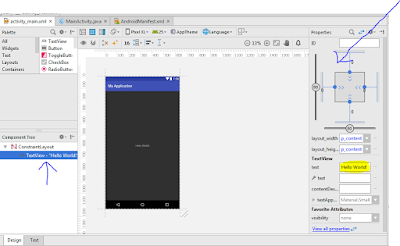
Click on the number “8” that says Default Margin in the same
On top of Default Margin button, you could see Device in Editor, that has a list of model
You could see TextView
 |
Delete the TextView option under theConstraintLayout.
If you are finding any warnings of the codes, you can click on the bell button on
Message: [I18N] Hardcoded string “Ship Me This”, should use `@string` resource
Suggested Fixes:
– Extract string resource
– Suppress: Add tools: ignore=”HardcodedText” attribute
Priority: 5 / 10 Category: Internationalization Severity: Warning Explanation: Hardcoded text. Hardcoding text attributes directly in layout files is bad for several reasons: * When creating configuration variations (for example for landscape or portrait)you have to repeat the actual text (and keep it up to date when making changes) * The application cannot be translated to other languages by just adding new translations for existing string resources. There are
quickfixes to automatically extract thishardcoded string into a resource lookup.
Try playing around with other options too.
